

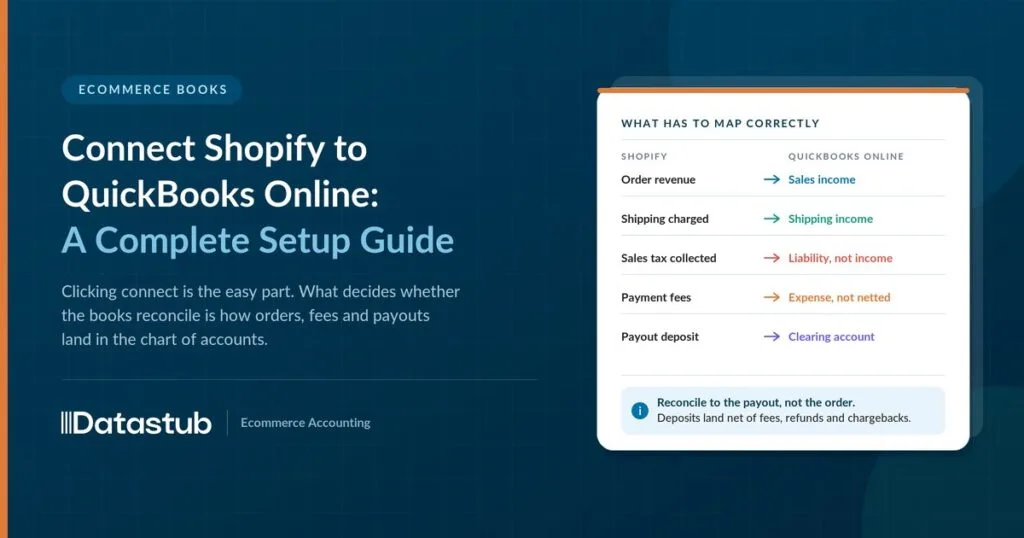
Your Shopify dashboard says you made $4,200 this week. Your bank account got a deposit of $3,890. Neither number is wrong. But if QuickBooks doesn’t know why they’re different, your books are wrong the moment you record either one.
That gap is fees, refunds, and sales tax, bundled into one payout before it ever touches your bank account. Connect Shopify to QuickBooks Online the right way, and that gap gets explained automatically, line by line. Connect it without understanding what it’s doing, and sales get recorded twice, tax sits in the wrong account, or payouts nobody can match to a bank deposit.
Here’s what the official Shopify-QuickBooks connection actually does, what it doesn’t do, and how to set it up so your books match your bank from day one.
What the Integration Actually Is
The official connection between the two platforms is called the Shopify Connector by QuickBooks. Intuit builds and maintains it, not a third-party developer. It’s free for any QuickBooks Online subscriber. Install it from the Shopify App Store, or directly inside QuickBooks Online under Apps.
Once connected, it pulls your Shopify orders, refunds, payouts, fees, and inventory into QuickBooks automatically. You stop re-typing every sale by hand. That kind of automation is what makes e-commerce bookkeeping manageable once your order volume gets real.
What Actually Syncs Between the Two Platforms
The connector doesn’t just move a total sales number over. It breaks each transaction into the pieces your books actually need.
| Shopify activity | What shows up in QuickBooks |
|---|---|
| A sale | A Sales Receipt with the product, tax, shipping, and discount broken out |
| Shopify’s fee on that sale | A separate Expense transaction |
| A refund | A Refund transaction, tied to the original sale |
| A payout to your bank | A Deposit transaction bundling every sale and fee in that payout |
| Products sold | Inventory items, matched by SKU (stock keeping unit) or name where possible |
A single payout isn’t one number. It’s built from dozens of sales, fees, and refunds. The connector keeps every piece visible instead of collapsing it into a mystery deposit.
A skincare brand ships 40 orders in a day, totaling $2,600 in sales. Shopify deducts $75 in payment processing fees before sending the payout. QuickBooks records the $2,600 in sales receipts, a $75 fee expense, and a $2,525 deposit. The bank match comes out exact, instead of a guess.
Setup: What You Need Before You Connect
The connection itself takes a few minutes. A clean setup depends on a handful of decisions made correctly the first time.
- A QuickBooks Online subscription — any tier works, from Simple Start through Advanced
- Your Shopify store’s original URL (my-store.myshopify.com, not a custom domain)
- Your Shopify login, with permission to install apps on the store
- A decision on your bank Deposit account — where payouts should land
- A decision on how far back to import — up to 12 months of prior Shopify transactions
Connecting the Two Platforms
From QuickBooks Online, go to Apps, search for the Shopify Connector by QuickBooks, and select it. Enter your Shopify store URL, sign in to Shopify, and authorize the connection. QuickBooks then walks you through a settings screen before the first sync runs. Getting this right the first time is exactly the kind of accounting software setup work that saves months of cleanup later.
Three settings on that screen decide whether the setup stays clean or turns into cleanup work later.
Transaction Sync Date
How far back to pull Shopify orders — up to 12 months. Pick a date that doesn’t overlap with sales you’ve already entered manually. Overlap creates duplicates.
Product Tracking
Turn this on to match Shopify products to QuickBooks inventory items by SKU and name. Leave it off, and every sale gets lumped into one generic “Shopify Sales Item” line. That’s fine for a simple service business. It’s a problem if you need to see which products actually sell.
Add Transactions Automatically
Turn this on, and QuickBooks auto-posts transactions it’s confident about. It only flags the ones missing information. Leave it off, and every transaction waits for manual review — accurate, but slow at real volume.
The initial import can take anywhere from 10 minutes to 3 hours, depending on how much history you’re pulling in. Large volumes import in batches. It’s normal for a big import to take a while to finish.
How One Sale Actually Moves Through Both Systems
Understanding this flow is what makes reconciliation make sense later, instead of feeling like a black box. Here’s what happens, in order:
- A sale happens on Shopify.
- QuickBooks creates a Sales Receipt and a Fee Expense.
- Both sit in a holding account called Undeposited Funds.
- Shopify groups multiple sales into one payout.
- QuickBooks creates a Deposit that matches your bank feed.
Every individual sale and its fee sit in Undeposited Funds until Shopify actually pays out. When the payout happens, QuickBooks bundles every sale and fee from that payout into one Deposit transaction. That’s what shows up in your bank feed. Match that deposit to the bank line, and the whole batch reconciles at once, not one transaction at a time.
A phone accessories store sells a $34 case at 3:15 PM. QuickBooks creates a $34 Sales Receipt and a $1.20 Expense for the processing fee. Both sit in Undeposited Funds. That night, Shopify pays out the day’s sales in one batch. QuickBooks creates one Deposit for the net amount. The store’s bookkeeper matches it to the bank feed the next morning — one match covering the whole day, not forty.
One rule matters here: always confirm transactions in the Integration Transactions tab first. Then let QuickBooks match the deposit in the bank feed. Manually adding the deposit yourself, instead of matching it, is one of the most common ways this setup breaks.
How Sales Tax Gets Handled
Sales tax on a Shopify order can be collected two different ways. The connector treats them differently.
When Shopify Collects the Tax on Your Behalf
For sales made through the Shop app, Shopify sometimes acts as the collector. It pays the tax authority directly, then sends you the rest of the payout. These show up labeled as marketplace tax. The connector records the tax as a liability when the sale happens, then adjusts that liability back down when the payout arrives. Shopify already handled the remittance, so you don’t owe it twice.
When You’re the One Responsible for the Tax
For most regular Shopify sales, you owe the tax to the state, not Shopify. The connector calculates what’s owed based on your sales tax setup for that location. It books the amount to your Sales Tax Payable account, the same way any other taxable sale gets recorded.
A furniture retailer sells a $600 dining set to a customer in a state where the retailer is registered to collect sales tax. The connector books the tax straight to Sales Tax Payable, the same account used for the retailer’s other taxable sales. No special handling needed. If that same retailer makes a sale through the Shop app instead, where Shopify collects marketplace tax, the connector recognizes the difference and adjusts automatically once the payout lands.
If multi-state sales tax exposure is new territory, our post on how product taxability shifts state by state covers the layer most sellers miss.
If You Sell Wholesale: B2B Orders Work Differently
Shopify’s B2B (business-to-business) feature lets a store sell to other businesses at wholesale terms. The connector treats those orders differently from a regular retail sale.
- A B2B order becomes an Invoice in QuickBooks, not a Sales Receipt, because payment doesn’t happen immediately the way a retail checkout does.
- The buyer’s company information — name, billing address, email — gets recorded as a Company. Shopify tags B2B buyers as a distinct customer type for reporting.
- Payment terms like Net 30 or Net 60 carry over from the Shopify order onto the QuickBooks invoice.
- If the invoice gets paid, that payment links back to the original invoice automatically. Mark it paid inside QuickBooks instead, and that status syncs back to Shopify.
An apparel maker sells direct-to-consumer through their regular Shopify store, and wholesale to boutiques through Shopify B2B. A $2,400 wholesale order to a boutique on Net 30 terms becomes an Invoice due in 30 days, tagged to that boutique as a Shopify B2B company. That’s completely separate from the $85 retail orders flowing in as Sales Receipts the same day.
Where the Official Connector Falls Short
The free connector handles the standard case well: one Shopify store, Shopify Payments as the processor, QuickBooks Online. It gets more complicated outside that case.
- It only supports QuickBooks Online. QuickBooks Desktop needs a different, third-party connection entirely.
- If you take payments through more than one gateway — PayPal and Klarna alongside Shopify Payments, for instance — you’re reconciling each one separately. The free connector doesn’t unify multiple payout sources into one clean match.
For a straightforward single-channel store, none of this matters much. For a multi-channel or multi-gateway business, a paid third-party app can be worth the monthly cost.
| Situation | What helps |
|---|---|
| Single store, Shopify Payments only | The free official connector is usually enough |
| Multiple payment gateways (PayPal, Klarna, etc.) | A dedicated payout-reconciliation app that matches every gateway separately |
| Selling across Shopify, Amazon, and other channels at once | A multi-channel accounting automation app built for cross-platform sync |
| Still on QuickBooks Desktop | A dedicated Desktop-to-cloud bridge, since the free connector is Online-only |
The decision isn’t about which tool is “better.” It’s about whether your setup is simple enough for the free connector to fully cover.
How Datastub Helps
Connecting Shopify to QuickBooks is the easy part. Deciding which deposit account to use, whether to turn on product tracking, and how sales tax should map to your chart of accounts is what actually determines whether your books stay clean. At Datastub, we set this integration up correctly from the start. We configure it around your specific setup, single gateway or multiple, retail-only or wholesale too, and clean up connections that were never quite reconciling right. If your Shopify payouts and QuickBooks deposits have never quite matched, we’ll find out why and fix it. It’s the same hands-on work we cover in our bookkeeping services, applied specifically to e-commerce accounting.
FAQ
Is the Shopify-QuickBooks connector free?
Yes. The Shopify Connector by QuickBooks is free for any QuickBooks Online subscriber, on any plan tier. Paid third-party alternatives exist for more complex setups, but the official connector itself costs nothing extra.
Does it work with QuickBooks Desktop?
No. The official connector is built for QuickBooks Online only. Businesses still on QuickBooks Desktop need a separate, third-party connection method to sync with Shopify.
Why doesn’t my Shopify payout match my QuickBooks deposit?
It usually does, once everything is set up correctly. A payout deposit in QuickBooks already nets out fees, refunds, and adjustments, so it should match your bank feed exactly. If it doesn’t, the most common cause is a transaction still sitting in the For Review tab that never got confirmed before the payout was added.
Can I import more than a year of past Shopify sales?
No. The connector only imports up to 12 months of historical transactions. Anything older needs to be entered or migrated another way.
Do I need to manually enter sales tax?
No. The connector automatically tracks tax collected through Shopify, whether Shopify collected it as a marketplace facilitator or you’re the one responsible for remitting it. It books the tax to the correct account without manual entry.
What happens if I sell through Shopify and another channel, like Amazon?
The official connector only handles Shopify. If you’re running multiple sales channels into one QuickBooks file, you’ll likely want a multi-channel accounting app built to unify them, rather than relying on separate single-channel connectors.
Final Thought
The Shopify-QuickBooks connector isn’t complicated once you understand what it’s doing. Every sale becomes a sales receipt. Each fee becomes an expense. Every payout becomes one deposit that should match your bank exactly.
The setup decisions that matter — which deposit account to use, whether to track products, how far back to import — take five minutes to get right. They take months of cleanup to fix if they’re wrong. Get the settings right on day one, confirm transactions before matching deposits, and the reconciliation that used to take hours starts taking minutes.
Not sure your Shopify-QuickBooks connection is set up right, or ready to connect it for the first time? Reach out to Datastub for a free review, and we’ll tell you straight what’s working and what needs fixing.
This piece reflects Intuit’s official documentation for the Shopify Connector by QuickBooks and the Shopify App Store listing, both verified as of August 2026. Features, pricing, and third-party app details change — confirm current specifics at quickbooks.intuit.com or apps.shopify.com before relying on them. This is general product information, not tax, legal, or financial advice.